There’s something magical about holiday baking that turns simple ingredients into edible joy—and nothing captures that festive spirit quite like Candy Cane Cake Pops. These little bites of peppermint perfection became my happy accident a few Christmases ago when I tossed leftover crushed candy canes onto some plain cake pops. The moment those red-and-white shards hit the white chocolate coating, I knew I’d stumbled onto something special. Now, they’re my go-to holiday treat—the kind that makes kids’ eyes light up and adults sneak seconds when they think no one’s looking. Whether you’re gifting them in cute boxes or piling them high on a dessert table, these pops taste like Christmas cheer in every bite.
Why You’ll Love These Candy Cane Cake Pops
Oh my gosh, where do I even start? These peppermint pops are my absolute favorite holiday treat to make—and here’s why you’ll adore them too:
- Instant holiday cheer: That red-and-white candy cane crunch? It’s like Christmas morning in every bite.
- So easy a reindeer could do it: Seriously, if I can make these after three eggnogs, you’ve got this.
- Gift-worthy cuteness: Tie them with ribbon in little cellophane bags—boom, instant teacher/hostess/neighbor gifts.
- Party superstar: They disappear faster than Santa’s cookies at any holiday gathering.
- Kid-friendly fun: My nieces go wild decorating these (though we always end up with more sprinkles on the floor than the pops!).
Trust me, once you make these once, they’ll become your new holiday tradition too!
Ingredients for Candy Cane Cake Pops
Okay, let’s gather our festive ingredients! I promise this list is as simple as wrapping presents (and way more fun). Here’s what you’ll need to make these holiday magic pops:
- For the cake:
- 1 box (15 oz) white cake mix – trust me, the boxed kind works perfectly here
- 1 cup water
- 3 large eggs – room temp is best
- 1/2 cup vegetable oil
- 1/2 tsp peppermint extract – this is where the holiday flavor kicks in!
- For the frosting:
- 4 Tbsp unsalted butter, softened (not melted!)
- 4 oz cream cheese, softened
- 1/2 tsp peppermint extract – yes, more peppermint goodness
- 2 cups powdered sugar – sifted if you’re feeling fancy
- For the coating & decoration:
- 24 oz vanilla candy coating – I like the vanilla almond bark from the baking aisle
- 8 standard size peppermint candy canes – unwrapped and crushed (smashing them in a ziplock bag with a rolling pin is my stress relief!)
Psst – if you love the peppermint-chocolate combo as much as I do, you might want to check out my chocolate peppermint bread recipe too. It’s another holiday favorite!
How to Make Candy Cane Cake Pops
Alright, let’s get to the fun part—making these adorable peppermint pops! I’ve made this recipe so many times I could probably do it in my sleep, but I’ll walk you through each step so yours turn out perfect on the first try. Don’t worry if they’re not all identical—that just adds to their homemade charm!
- Preheat & Prep: Fire up your oven to 350°F and give a 9×13″ baking dish a quick spritz with cooking spray. Trust me, you don’t want to skip this—nothing’s worse than cake sticking!
- Candy Cane Crush: Unwrap those candy canes and let out some holiday frustration by smashing them into small chunks. I use a ziplock bag and rolling pin—therapeutic and efficient! Save about 1/4 of the crushed bits for decorating later.
- Mix the Magic: Whip up the cake batter following the box directions, but here’s my secret—add that 1/2 tsp peppermint extract right into the batter. Then fold in most of your crushed candy canes (save some for topping!). The batter will smell like Christmas morning.
- Bake & Cool: Pop that pepperminty goodness in the oven for about 25 minutes (or until a toothpick comes out clean). Let it cool completely—I know it’s tempting, but warm cake crumbles too much when you’re making pops!
- Frosting Time: While the cake cools, beat together the butter and cream cheese until smooth. Mix in the peppermint extract and powdered sugar until you’ve got a fluffy cloud of frosting. This is what makes the pops moist and delicious.
- Crumb & Roll: Crumble the cooled cake into a big bowl—get your hands in there! Mix in the frosting until it holds together when you squeeze it. Then roll into 1.5-inch balls (I use a cookie scoop for even sizes). Chill these for 10 minutes—this helps them stay together when dipping.
- Dip & Decorate: Melt the candy coating according to package directions. Here’s my pro tip: use a fork to dip each pop, letting excess coating drip off before transferring to parchment paper. Immediately sprinkle with reserved candy cane bits before the coating sets. Work quickly—this part’s like edible arts and crafts!

If you love no-bake treats as much as I do, you’ll adore these no-bake Oreo balls—they’re another crowd-pleaser!
Decorating Tips for Candy Cane Cake Pops
Now for the best part—making these pops as festive as your Christmas tree! Here are my favorite ways to jazz them up:
- Striped Elegance: Drizzle melted red candy melts over the white-coated pops for candy cane stripes.
- Glitter Magic: A dusting of edible glitter makes them sparkle like fresh snow.
- Color Pop: Alternate red and white nonpareils for extra crunch and color.
- Peppermint Swirl: Before the coating sets, gently swirl a toothpick through the candy cane pieces for a marbled effect.
- Holiday Sprinkles: Mini holly or snowflake sprinkles turn these into edible ornaments.

Remember—there’s no wrong way to decorate these! Half the fun is getting creative with whatever holiday sprinkles you have on hand.
Tips for Perfect Candy Cane Cake Pops
After making hundreds of these peppermint pops (and yes, eating just as many), I’ve learned all the tricks to avoid cake pop disasters. Here’s my hard-earned wisdom to make sure yours turn out picture-perfect every time:
- Don’t rush the cooling: I know it’s tempting, but warm cake crumbles instead of rolling. Wait until it’s completely cool—about an hour should do it.
- Texture is everything: When mixing the cake crumbs with frosting, aim for a consistency like Play-Doh. Too dry? Add a teaspoon more frosting. Too sticky? A sprinkle of powdered sugar helps.
- Chill like you mean it: Those 10 minutes in the fridge aren’t optional! It helps the pops hold their shape when you dip them. I once skipped this step and ended up with cake pop soup—learn from my mistake!
- Coating temperature matters: Melt your candy coating slowly (I do 30-second bursts in the microwave). If it’s too hot, it’ll slide right off. Too thick? A tiny bit of coconut oil thins it perfectly.
- Work in small batches: Only take a few pops from the fridge at a time. Room temp pops + warm hands = misshapen treats. Trust me, I’ve made lopsided “Christmas asteroids” before!
- Decorate fast: Sprinkle those candy cane bits immediately after dipping—the coating sets quicker than you’d think. I keep all my toppings measured and ready to go before I start dipping.
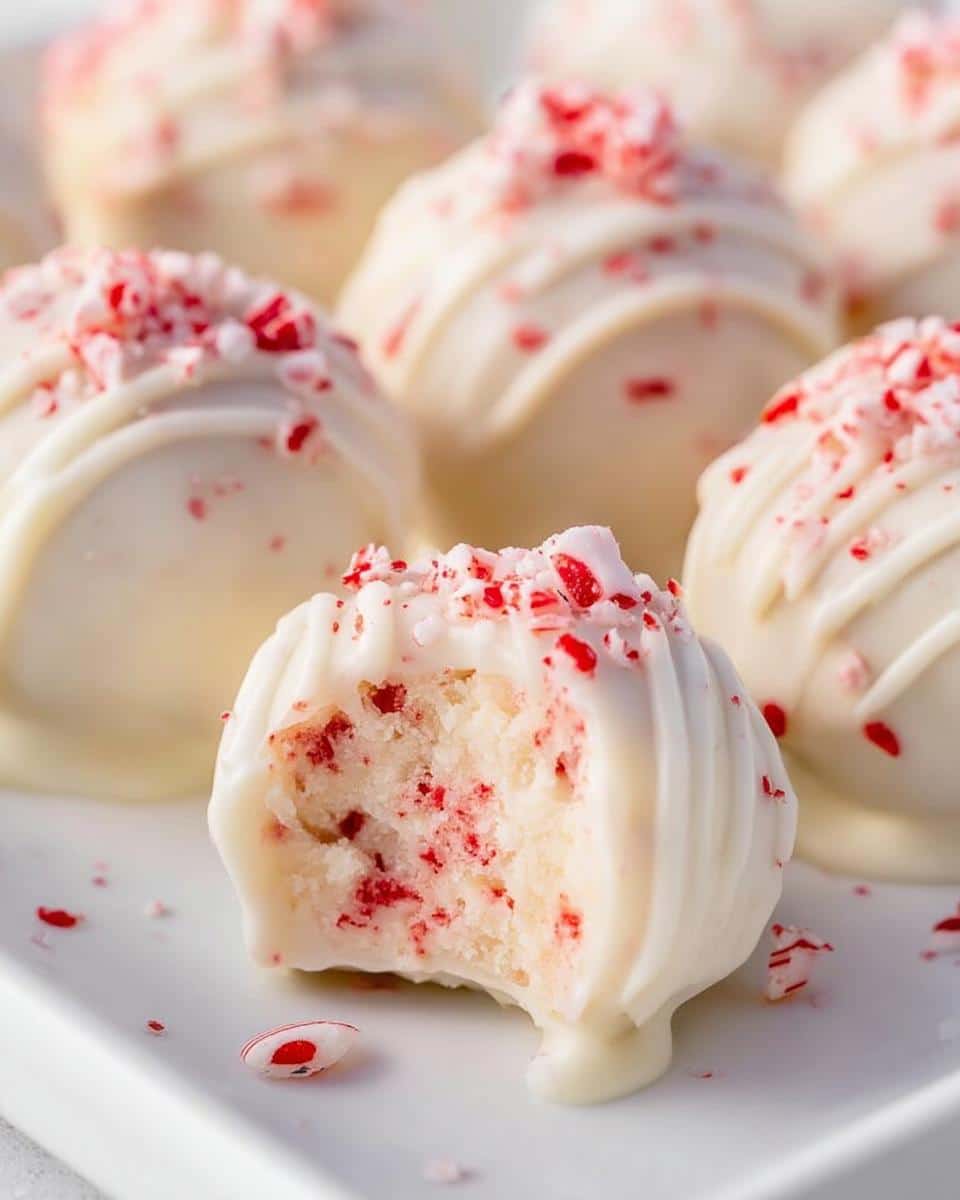
The best part? Even the “ugly” ones still taste amazing. But follow these tips, and you’ll have pops pretty enough for Santa’s cookie plate!
Storing and Serving Candy Cane Cake Pops
Now that you’ve made these adorable peppermint pops, let’s talk about keeping them fresh and showing them off! Here’s my go-to method: store them in an airtight container with parchment between layers (so they don’t stick together) in the fridge for up to 2 weeks. The candy coating actually helps seal in moisture—mine never last that long though!
For serving, I love getting creative:
- Stick them in a foam block wrapped in festive paper for a “cake pop tree” centerpiece
- Tuck them into mini gift boxes tied with ribbon—instant holiday presents!
- Arrange them on a platter with fresh mint sprigs for a bakery-worthy display
- Pop them in clear cellophane bags with a candy cane tag for cookie exchanges

Pro tip: If you’re transporting them, keep them chilled until the last minute—that candy coating can get melty in warm cars!
Nutritional Information for Candy Cane Cake Pops
Now, I’m no nutritionist—I’m just a baker who believes holiday treats should be enjoyed guilt-free! These candy cane cake pops are definitely in the “special occasion” category (we’re talking butter, sugar, and all the good stuff). The nutritional values will vary depending on your specific ingredients and how big you make your pops. A general estimate per pop includes calories from the cake, frosting, and candy coating, plus small amounts of protein from the eggs and cream cheese. Remember, these are meant to be festive indulgences—like all good holiday treats, they’re best enjoyed in moderation while wearing stretchy pants!
Frequently Asked Questions About Candy Cane Cake Pops
I get so many questions about these festive little treats—here are the answers to everything you might be wondering before you start baking!
Can I use homemade cake instead of box mix?
Absolutely! While I love the convenience of box mix (especially during the busy holidays), any white or vanilla cake recipe works great. Just bake it in a 9×13″ pan and crumble it once cooled. My grandma’s vanilla cake is my go-to when I have extra time—it makes these pops extra special!
How far in advance can I make these?
These pops are perfect for prepping ahead! You can make them up to 2 weeks before serving—just store them in an airtight container in the fridge. The candy coating actually helps keep them fresh. For the best texture, I recommend letting them sit at room temp for about 15 minutes before serving.
Can I freeze candy cane cake pops?
You sure can! Freeze them undecorated (just the cake balls) for up to 3 months. Thaw in the fridge overnight before dipping and decorating. Already decorated pops can freeze too—just know the candy cane pieces might lose a tiny bit of crunch.
What if I can’t find candy coating?
No worries! White chocolate chips work in a pinch—just add a teaspoon of coconut oil per cup of chips when melting to help it coat smoothly. The flavor will be slightly different but still delicious. Check out my Christmas baking recipes for more holiday treat ideas!
Why are my cake pops cracking?
This usually happens if the cake balls are too cold when dipped or the coating is too hot. Let chilled pops sit at room temp for 5 minutes before dipping, and make sure your melted coating isn’t piping hot. A few tiny cracks are normal though—just cover them with extra candy cane pieces!
More Holiday Dessert Ideas
If these candy cane cake pops got you in the holiday baking spirit (and let’s be honest—how could they not?), you’ll love these other festive treats from my kitchen! My chocolate peppermint bread is like a cozy Christmas sweater in dessert form—rich, comforting, and packed with that same peppermint-chocolate magic. Or try gingerbread cake pops for a spiced twist on this recipe. Whatever you choose, just promise me one thing—save some for Santa!
Print
Candy Cane Cake Pops
- Total Time: 45 min
- Yield: 24 cake pops 1x
- Diet: Vegetarian
Description
Festive peppermint cake pops with crushed candy canes, perfect for holiday desserts.
Ingredients
- 8 standard size peppermint candy canes, plastic wrappers removed
- 1 box (15 oz) white cake mix
- 1 cup water
- 3 large eggs
- 1/2 cup vegetable oil
- 1/2 tsp peppermint extract
- 4 Tbsp unsalted butter, softened
- 4 oz cream cheese, softened
- 1/2 tsp peppermint extract
- 2 cups powdered sugar
- 24 oz vanilla candy coating
Instructions
- Preheat oven to 350°F and lightly spray a 9×13″ baking dish with cooking spray.
- Crush candy canes into small chunks and set aside.
- Prepare cake batter according to package directions, mixing in peppermint extract.
- Stir in 3/4 of the crushed candy canes.
- Bake cake as directed on the box, then cool completely.
- Beat butter and cream cheese until smooth, then mix in peppermint extract and powdered sugar.
- Crumble cooled cake and mix with frosting until it holds together.
- Roll mixture into balls and chill for 10 minutes.
- Melt candy coating and dip each cake pop, then sprinkle with reserved candy cane pieces.
- Chill again before serving or storing.
Notes
- Store cake pops in an airtight container in the fridge for up to 2 weeks.
- Use a fork to dip cake pops for even coating.
- Prep Time: 20 min
- Cook Time: 25 min
- Category: Dessert
- Method: Baking
- Cuisine: American
Nutrition
- Serving Size: 1 cake pop
- Calories: 180
- Sugar: 15g
- Sodium: 120mg
- Fat: 8g
- Saturated Fat: 4g
- Unsaturated Fat: 3g
- Trans Fat: 0g
- Carbohydrates: 25g
- Fiber: 0g
- Protein: 2g
- Cholesterol: 25mg
Keywords: Candy Cane Cake Pops, Christmas desserts, holiday treats, peppermint cake pops

