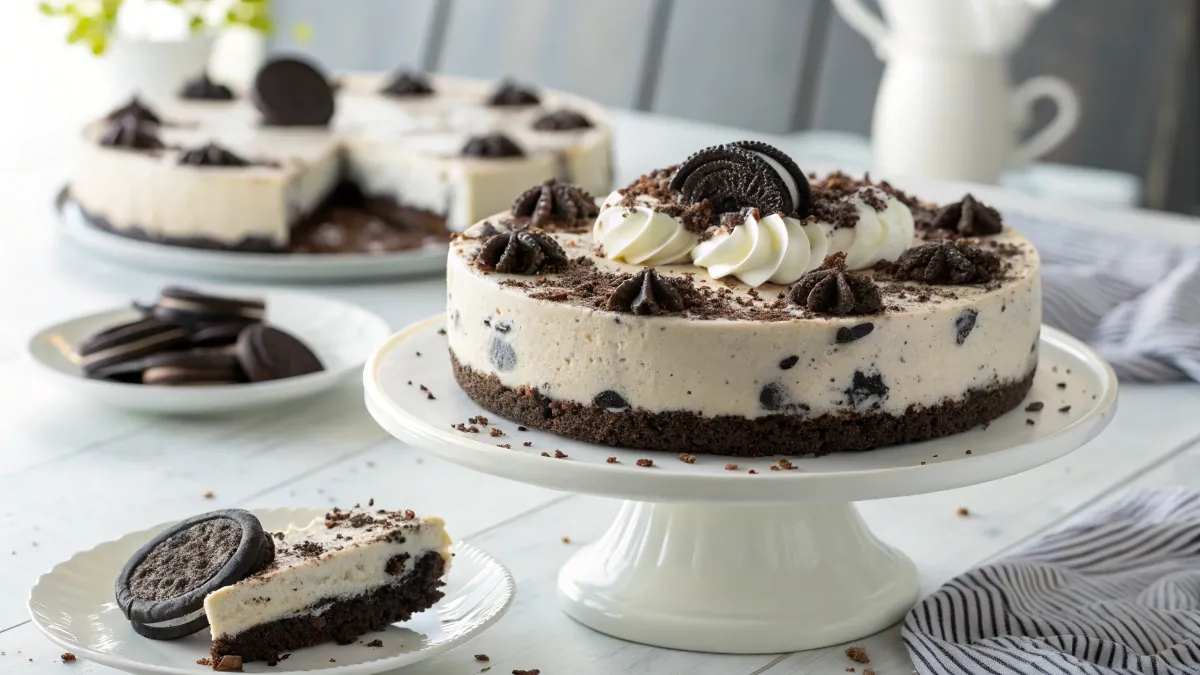
Oreo Cheesecake – just hearing the name is enough to make your mouth water, right? If you’ve ever struggled with complicated dessert recipes or felt overwhelmed by the idea of baking, then this is the treat you’ve been waiting for! This Oreo Cheesecake is not only ridiculously easy to make but also a guaranteed crowd-pleaser. Imagine layers of creamy, velvety cheesecake with crunchy Oreo bits in every bite. It’s the perfect combination of rich flavor and irresistible texture. Plus, it’s versatile enough to serve at a fancy dinner party or as a fun weeknight indulgence.
In addition, you can easily customize it with different toppings or even turn it into a no-bake version for those hot summer days. The best part? It doesn’t require any fancy techniques or hard-to-find ingredients, making it perfect for both beginners and seasoned bakers. So, if you’re ready to impress your friends or simply satisfy your sweet tooth, keep reading! You’re about to discover the easiest, most delicious Oreo Cheesecake recipe ever.
Why Oreo Cheesecake Is the Perfect Dessert
Irresistible Flavor Combinations
Oreo Cheesecake is like a dream come true for dessert lovers. The creamy, rich cheesecake filling perfectly blends with the crunchy Oreo crust, creating an unforgettable taste. First, you get that smooth, velvety texture that melts in your mouth. Then, the delightful crunch of Oreos adds just the right contrast. It’s like having the best of both worlds in one bite. Also, the chocolatey, slightly salty Oreo flavor balances the sweet, tangy cheesecake so well. You can even play around with different Oreo flavors, like mint or peanut butter, to make it your own. In addition, the combination of cream cheese and Oreos is a match made in dessert heaven. Whether you like a thick crust or a more delicate layer, you can easily adjust it to your preference. Honestly, Oreo Cheesecake is one of those desserts that leaves everyone asking for seconds. It’s that good!
Flavor Combinations Overview
| Flavor Component | Description | Variation Ideas |
|---|---|---|
| Creamy Cheesecake | Smooth, velvety texture | Add flavored extracts (e.g., vanilla, almond) |
| Crunchy Oreo Crust | Contrasts with the creamy filling | Use different Oreo flavors (mint, peanut butter) |
| Sweet & Tangy | Perfect balance of chocolatey and tangy notes | Combine with fruit toppings for freshness |
| Versatility | Can be adjusted to preference (thick or thin) | Add layers or swirl in caramel/chocolate |
Ideal for Any Occasion
Oreo Cheesecake is perfect for any occasion, whether it’s a birthday, holiday, or just a regular Friday night. It’s a crowd-pleaser that brings smiles to everyone’s faces. Also, it’s super versatile. You can make it as a fancy layered cake for a special event or as simple bite-sized treats for casual gatherings. In addition, it’s great for potlucks because it’s easy to transport and serve. You don’t have to worry about it getting messy. Next, it’s a fun project to do with kids or friends. They’ll love crushing the Oreos and licking the spoon! Plus, you can personalize it by adding toppings like whipped cream, chocolate drizzle, or even fresh berries. It feels special without being overly complicated. Honestly, Oreo Cheesecake is one of those desserts that fits every occasion, big or small. So, whether you’re celebrating or just craving something sweet, this is the go-to treat.
How to Make Oreo Cheesecake from Scratch
Essential Ingredients and Tools
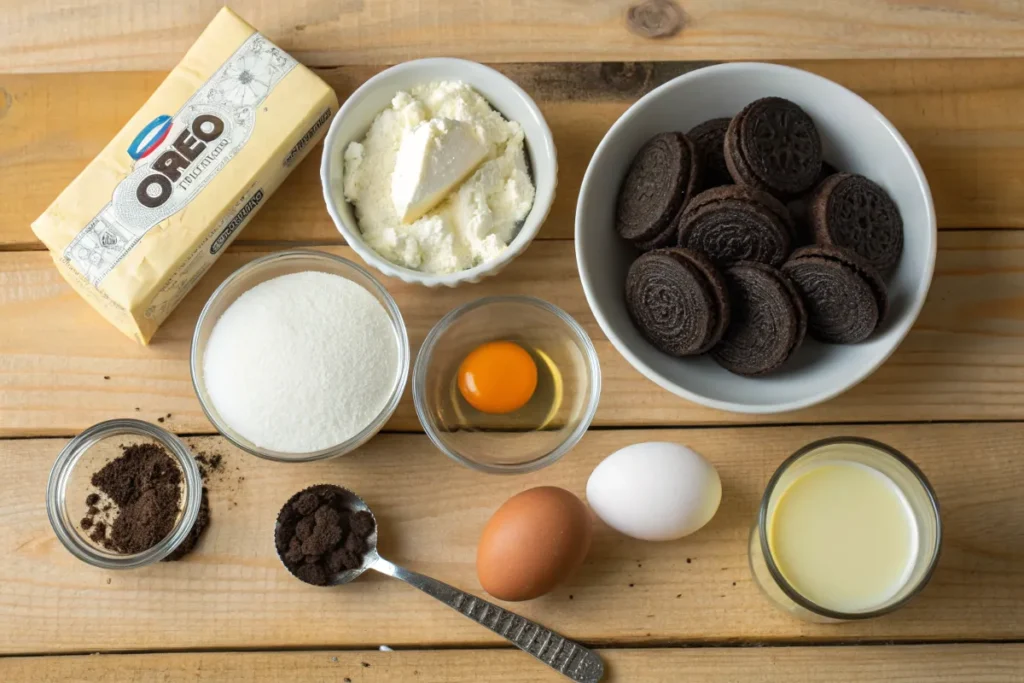
Making Oreo Cheesecake from scratch is easier than you think! You’ll need basic ingredients: cream cheese, sugar, eggs, vanilla, Oreos, and butter for the crust. The butter helps the Oreo crumbs stick together, giving the crust a rich, buttery flavor. A springform pan is a must for easy removal without ruining the cheesecake’s shape. To crush the Oreos, use a food processor or a rolling pin and plastic bag if you prefer a chunkier texture. For a super smooth filling, a hand mixer or stand mixer is perfect. It blends the cream cheese and sugar to a silky, creamy consistency. Also, adding crushed Oreos to the filling gives a delicious crunch in every bite. With the right ingredients and tools, you’re all set to make a creamy, dreamy homemade Oreo Cheesecake that everyone will love!
Ingredients and Tools Checklist
| Ingredient | Purpose | Tips for Best Results |
|---|---|---|
| Cream Cheese | Creamy texture and rich flavor | Use full-fat for best consistency |
| Sugar | Sweetness and structure | Adjust to taste (less for less sweetness) |
| Eggs | Binding agent for a smooth filling | Add one at a time to avoid overmixing |
| Vanilla Extract | Enhances flavor | Use pure extract for richer taste |
| Oreo Cookies | Crust and mix-ins | Choose different flavors for variations |
| Butter | Binds crust together | Melted for easy mixing |
| Springform Pan | Easy removal of cheesecake | Grease or line for smooth release |
| Food Processor/Rolling Pin | Crushes Oreos for crust | Choose according to texture preference |
| Hand Mixer/Stand Mixer | Blends filling smoothly | Avoid overmixing to prevent cracks |
Step-by-Step Preparation Tips
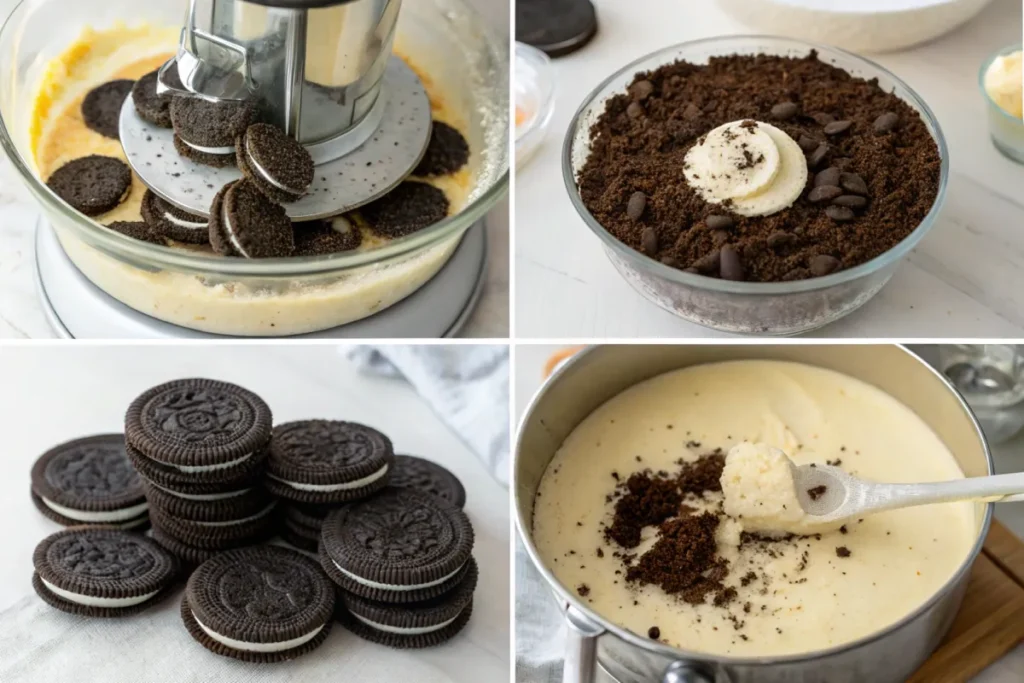
Making Oreo Cheesecake is a fun and simple process if you follow a few easy steps. First, start by preparing the crust. Crush the Oreos into fine crumbs and mix them with melted butter. Then, press the mixture firmly into the bottom of your springform pan. Next, bake it for about 10 minutes to set the crust. This helps it stay crunchy. While the crust is cooling, make the filling. Beat the cream cheese and sugar until smooth, then add eggs one at a time. Also, mix in some vanilla extract for that extra touch of flavor. In addition, fold in crushed Oreos for a delightful surprise in every bite. Pour the mixture over the cooled crust and bake. Once done, let it cool before chilling in the fridge. Finally, add some whipped cream or extra Oreo crumbs on top. And there you have it – a perfect homemade Oreo Cheesecake!
Preparation Overview
| Step | Description | Tips for Success |
|---|---|---|
| Prepare the Crust | Crush Oreos, mix with melted butter, press in pan | Press firmly for a solid base |
| Bake the Crust | Bake for 10 minutes to set | Ensures a crunchy texture |
| Make the Filling | Beat cream cheese and sugar until smooth | Add eggs one at a time |
| Add Mix-ins | Fold in crushed Oreos | Do not overmix to maintain texture |
| Bake the Cheesecake | Pour filling over crust, bake in water bath | Water bath prevents cracks |
| Cool and Chill | Cool gradually, then refrigerate | Chill for at least 4 hours for firmness |
| Decorate and Serve | Top with whipped cream or crushed Oreos | Add toppings before serving for freshness |
Variations of Oreo Cheesecake You Need to Try
No-Bake Oreo Cheesecake Versions
No-Bake Oreo Cheesecake is perfect for those days when you don’t feel like turning on the oven. It’s super easy and just as delicious. First, start with the crust. Mix crushed Oreos with melted butter and press it firmly into a pan. Then, pop it in the fridge to set. Next, make the creamy filling by beating cream cheese with powdered sugar and vanilla. Also, fold in whipped cream to make it light and fluffy. In addition, add chunks of Oreo for extra crunch. The best part? You don’t have to bake it. Just pour the filling over the crust and let it chill for a few hours. It’s that simple! This version is perfect for summer days or when you’re short on time. Plus, it’s fun to customize. Try using flavored Oreos or adding chocolate chips. Honestly, no-bake Oreo Cheesecake is a game-changer for quick, delightful desserts.
Unique Flavor Twists and Toppings
One of the best things about Oreo Cheesecake is how easily you can switch up the flavors. It’s like a blank canvas waiting for your creative touch. First, try using different Oreo flavors like mint, peanut butter, or even red velvet. They add a fun twist to the classic taste. Also, you can mix in other ingredients like chocolate chips, caramel swirls, or crushed candy bars for added texture. In addition, toppings make all the difference. Drizzle some chocolate or caramel sauce on top for extra sweetness. Next, add a dollop of whipped cream or sprinkle crushed Oreos for a nice crunch. You can even add fresh berries to balance the richness. Honestly, the possibilities are endless. Whether you like it simple or extra fancy, Oreo Cheesecake is perfect for experimenting. So, get creative and make it your own delicious masterpiece!
Flavor Twists and Toppings Ideas
| Flavor Twist | Description | Suggested Combinations |
|---|---|---|
| Flavored Oreos | Use mint, peanut butter, or red velvet Oreos | Pair with matching toppings (e.g., mint chocolate) |
| Mix-ins | Chocolate chips, caramel swirls, crushed candy bars | Fold into filling for extra texture |
| Toppings | Chocolate drizzle, caramel sauce, whipped cream | Add just before serving for freshness |
| Fruit Additions | Fresh berries, banana slices, or citrus zest | Balances the richness of the cheesecake |
| Layering Options | Add layers of chocolate ganache or fruit puree | Creates a visually appealing dessert |
Tips for the Perfect Oreo Cheesecake Crust
Achieving the Right Texture
The crust is the foundation of any great Oreo Cheesecake, and getting the texture just right is key. First, crush the Oreos into fine crumbs. You can use a food processor for a super smooth texture or a plastic bag and rolling pin if you like it a bit chunkier. Then, mix the crumbs with melted butter until everything is well coated. This helps the crust stick together. Also, press the mixture firmly into the pan using the back of a spoon or a flat-bottomed glass. In addition, baking the crust for about 10 minutes gives it a nice crunch and helps it hold up under the creamy filling. If you’re making a no-bake version, just chill the crust in the fridge for a firmer base. Honestly, the right texture makes all the difference. It’s what gives Oreo Cheesecake that perfect bite every time.
Texture Tips for Oreo Cheesecake Crust
| Texture Element | Description | Tips for Success |
|---|---|---|
| Crushing Method | Fine crumbs for a firm base, chunky for more texture | Use a food processor for fine crumbs, rolling pin for chunky |
| Butter Ratio | Binds crumbs together for a solid crust | Adjust amount for desired firmness |
| Pressing Technique | Ensures even thickness and solid base | Use the back of a spoon or flat-bottomed glass |
| Baking vs. Chilling | Baking gives crunch, chilling keeps it soft | Choose based on preference and recipe type |
| Consistency Check | Should hold together when pressed but not too greasy | Adjust butter as needed |
Flavor Enhancements for the Base
The Oreo crust is delicious on its own, but you can make it even better with a few simple tweaks. First, try adding a pinch of salt to balance the sweetness. It sounds strange, but it works wonders. Also, mixing in a bit of sugar gives the crust a caramelized flavor when baked. In addition, you can enhance the richness by adding a spoonful of cocoa powder for a deeper chocolate taste. If you’re feeling adventurous, sprinkle in some cinnamon or espresso powder. It adds a unique twist without overpowering the Oreo flavor. Next, try using flavored Oreos like peanut butter or mint for a fun variation. Finally, brushing the crust with melted chocolate before adding the filling creates a delicious, crunchy layer. Honestly, with just a few changes, you can take your Oreo Cheesecake crust to the next level.
Common Mistakes to Avoid When Making Oreo Cheesecake
Preventing Cracks and Sinking
Cracks and sinking can be frustrating, but they’re easy to avoid with a few tips. First, don’t overmix the batter. Too much air causes cracks when it bakes. Also, bake the cheesecake in a water bath. It keeps the heat gentle and even, preventing the top from cracking. In addition, avoid opening the oven door too often. Sudden temperature changes can cause sinking. Next, let the cheesecake cool gradually by leaving it in the oven with the door slightly open. This prevents dramatic shrinkage. Finally, don’t rush the chilling process. Let it set in the fridge for at least 4 hours, or overnight if possible. This helps the cheesecake firm up and avoids sinking in the middle. Honestly, with these simple tips, your Oreo Cheesecake will come out perfectly smooth every time.
Storage and Serving Tips
Proper storage keeps Oreo Cheesecake fresh and delicious. First, let it cool completely before refrigerating. This prevents condensation from forming on the surface. Also, cover it tightly with plastic wrap or store it in an airtight container. This helps retain its creamy texture and prevents it from absorbing other fridge odors. In addition, cheesecake tastes even better the next day as the flavors meld together. If you want to store it longer, you can freeze the cheesecake. Just wrap it in plastic wrap and aluminum foil to avoid freezer burn. When ready to serve, thaw it in the fridge overnight. To get clean slices, use a sharp knife dipped in hot water and wiped dry between cuts. Finally, serve with fresh toppings like whipped cream, fruit, or extra crushed Oreos. These little touches make the Oreo Cheesecake even more irresistible!
Storage and Serving Tips Overview
| Aspect | Description | Tips for Best Results |
|---|---|---|
| Cooling | Prevents condensation and soggy texture | Let it cool completely before refrigerating |
| Covering | Maintains freshness and prevents odor absorption | Use plastic wrap or airtight container |
| Flavor Enhancement | Flavors meld and improve overnight | Best served the next day for maximum taste |
| Freezing | Allows long-term storage | Wrap in plastic wrap and aluminum foil |
| Thawing and Serving | Keeps texture intact when serving | Thaw in the fridge overnight |
| Clean Slicing | Ensures neat, attractive slices | Dip knife in hot water and wipe between cuts |
| Toppings | Adds freshness and visual appeal | Use whipped cream, fresh fruit, or crushed Oreos |
Frequently Asked Questions (FAQs)
Yes, you can use low-fat cream cheese for Oreo Cheesecake, but it may affect the texture. Low-fat cream cheese makes the cheesecake less rich and creamy. However, it’s still delicious! If you want a lighter version, go for it. Just remember, the consistency might be a bit softer. Also, the flavor might be slightly tangier. In addition, low-fat cream cheese can sometimes be more watery, so be sure to blend it well. If you prefer a firmer, creamier texture, stick with full-fat cream cheese. Either way, you’re going to love your Oreo Cheesecake!
Oreo Cheesecake needs to chill for at least 4 hours before serving. This helps it set properly and makes slicing easier. If you have time, chilling it overnight is even better. The flavors blend together beautifully, making it even more delicious. Also, a longer chill time gives it that perfect, creamy texture. In addition, it makes the crust firmer, so it holds up better when sliced. If you’re in a hurry, you can try 3 hours, but the cheesecake might be softer. Patience is key, but it’s worth the wait!
Absolutely! You can make a no-bake Oreo Cheesecake that’s just as delicious. It’s super easy and perfect for warm days when you don’t want to turn on the oven. Just mix crushed Oreos with melted butter for the crust and chill it. Then, blend cream cheese, sugar, and whipped cream for the filling. Fold in crushed Oreos for extra crunch. Pour the filling over the crust and let it chill for at least 4 hours. It’s that simple! No baking required, but all the creamy, Oreo goodness is still there. You’re going to love it!
Preventing cracks on Oreo Cheesecake is easy with a few simple tricks. First, avoid overmixing the batter. Too much air causes cracks. Next, bake it in a water bath. This keeps the temperature even and gentle. Also, don’t open the oven door too often. Sudden temperature changes can cause cracks. In addition, let it cool gradually by leaving the oven door slightly open. This prevents sinking and cracking. Finally, chill it in the fridge for at least 4 hours before serving. Follow these tips, and your Oreo Cheesecake will be perfectly smooth every time!
Satisfy Your Cravings with Homemade Oreo Cheesecake
Oreo Cheesecake is the perfect dessert to satisfy any sweet craving. It’s rich, creamy, and loaded with delicious Oreo goodness. Plus, it’s surprisingly easy to make at home. Whether you’re baking it from scratch or trying a no-bake version, you’re guaranteed to impress. Also, you can get creative with different flavors and toppings to make it your own. In addition, it’s perfect for any occasion – from birthdays to a casual family night. Imagine the smiles when you serve this irresistible treat! Honestly, nothing beats the combination of creamy cheesecake and crunchy Oreos. So, why wait? Gather your ingredients, follow the simple steps, and enjoy every bite. It’s a fun and rewarding way to treat yourself and your loved ones. You’re going to love how easy and delicious homemade Oreo Cheesecake can be. Now, it’s your turn to make this creamy delight and share the joy!
Print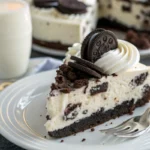
Oreo Cheesecake: Ultimate Guide to Creamy Delight
- Total Time: 6 hours 15 minutes (including chilling)
- Yield: 12 slices 1x
Description
This Easy Oreo Cheesecake is a creamy, dreamy, and oh-so-decadent dessert that combines the rich, velvety texture of cheesecake with the irresistible crunch of Oreo cookies. Perfect for beginners and seasoned bakers alike, this cheesecake has a buttery Oreo crust, a creamy cheesecake filling loaded with Oreo bits, and a chocolatey Oreo topping that will leave you wanting more. Whether you’re celebrating a special occasion or just indulging your sweet tooth, this Oreo Cheesecake is a guaranteed crowd-pleaser. Plus, it’s versatile enough for a no-bake version for those hot summer days!
Ingredients
Oreo Crust:
- 24 Oreo cookies (crushed into fine crumbs)
- ½ cup (1 stick) unsalted butter (melted)
Cheesecake Filling:
- 3 packages (8 oz each) cream cheese (softened)
- 1 cup granulated sugar
- 3 large eggs (room temperature)
- 1 teaspoon vanilla extract
- ½ cup sour cream (for extra creaminess)
- 12 Oreo cookies (crushed into chunks)
Topping (Optional):
- Whipped cream (for garnish)
- Crushed Oreos (for decoration)
- Chocolate drizzle (optional)
Instructions
Step 1: Make the Oreo Crust
- Preheat your oven to 350°F (175°C).
- Crush the Oreo cookies into fine crumbs using a food processor or by placing them in a ziplock bag and using a rolling pin.
- Mix the crushed Oreos with melted butter until well combined.
- Press the mixture firmly into the bottom of a 9-inch springform pan, creating an even layer.
- Bake for 10 minutes to set the crust, then let it cool while preparing the filling.
Step 2: Prepare the Cheesecake Filling
- In a large mixing bowl, beat the softened cream cheese and sugar until smooth and creamy.
- Add the eggs one at a time, beating well after each addition to avoid overmixing.
- Mix in vanilla extract and sour cream until well combined.
- Fold in the crushed Oreo chunks gently to distribute them evenly in the batter.
Step 3: Assemble and Bake
- Pour the cheesecake filling over the cooled Oreo crust, spreading it evenly.
- Place the springform pan in a water bath (wrap the bottom with aluminum foil to prevent leaks).
- Bake for 45-55 minutes, or until the edges are set but the center is slightly jiggly.
- Turn off the oven and let the cheesecake cool inside with the door slightly open for 1 hour to prevent cracks.
- Refrigerate for at least 4 hours (or overnight) to set completely.
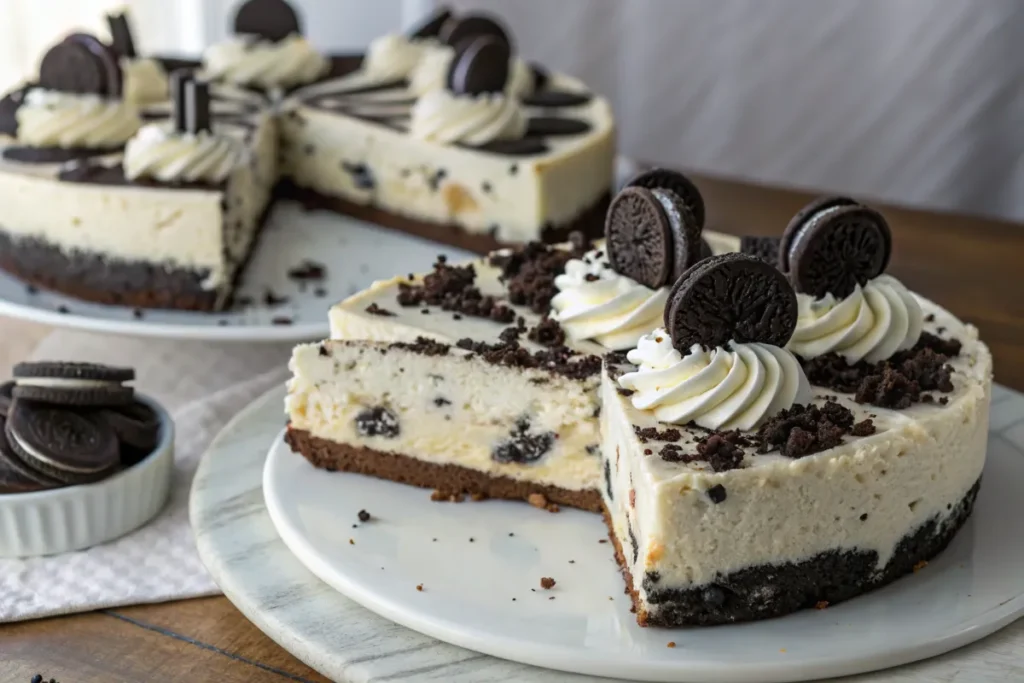
Step 4: Decorate and Serve
- Remove the cheesecake from the springform pan and place it on a serving plate.
- Top with whipped cream, crushed Oreos, and chocolate drizzle for a finishing touch.
- Slice and enjoy your delicious, creamy Oreo Cheesecake!
Notes
No-Bake Version:
- Skip baking the crust and let it set in the fridge for 30 minutes.
- Substitute eggs with 1 cup whipped cream (folded into the cheesecake filling).
- Chill the assembled cheesecake for at least 6 hours.
Storage Tips:
- Refrigerate: Store in an airtight container for up to 5 days.
- Freeze: Wrap individual slices in plastic wrap and foil, and freeze for up to 3 months. Thaw overnight in the fridge before serving.
Customizations:
- Different Oreo Flavors: Use Mint, Peanut Butter, or Golden Oreos for a fun twist!
- Add Mix-Ins: Try chocolate chips, caramel swirls, or fruit layers for extra flavor.
- Flavor Boost: Add ½ teaspoon almond extract or 1 tablespoon espresso powder to enhance the taste.
Tips for Success:
- Room Temperature Ingredients: Use softened cream cheese and room-temperature eggs for a smoother batter.
- Avoid Cracks: Use a water bath and avoid overmixing to prevent cracks on the surface.
- Clean Slices: Dip a sharp knife in hot water and wipe between each slice for clean cuts.
- Prep Time: 20 minutes
- Cook Time: 55 minutes
- Cuisine: American / Dessert
Nutrition
- Calories: ~450 kcal
- Sugar: ~30g
- Sodium: ~300 mg
- Fat: ~28g
- Saturated Fat: ~15g
- Carbohydrates: ~45g
- Protein: ~6g
- Cholesterol: ~100 mg