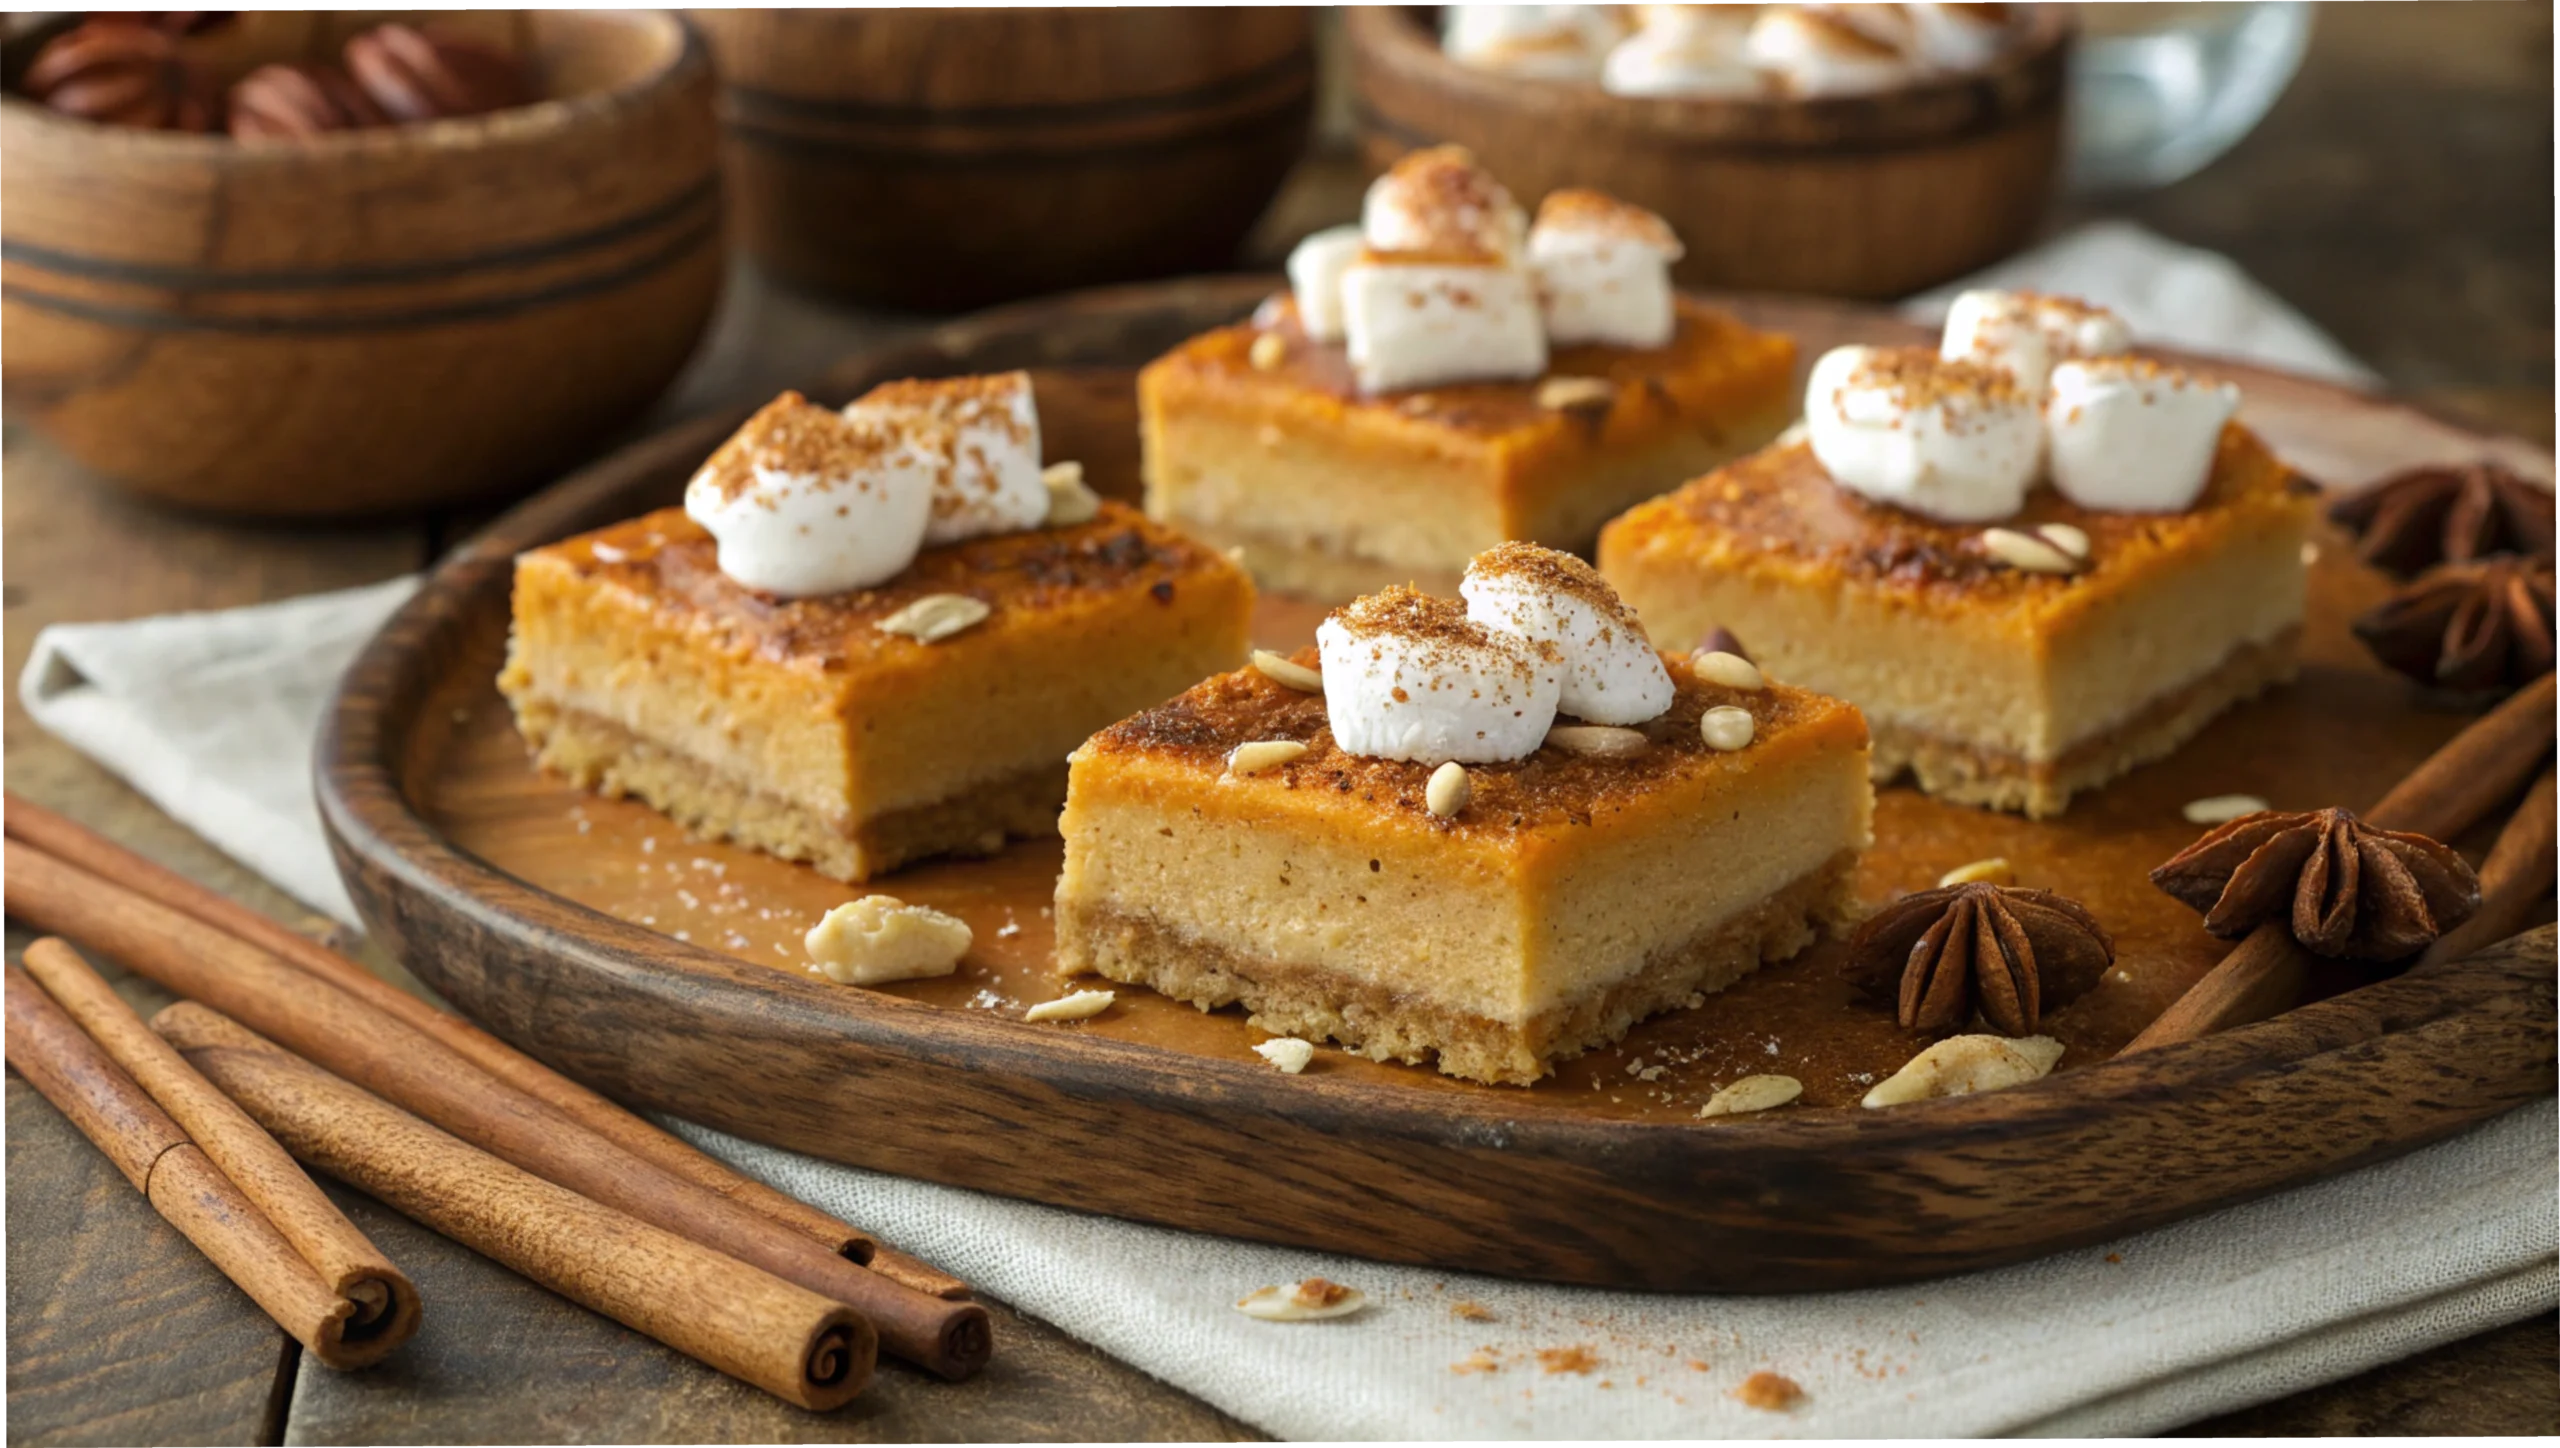
There’s something special about sweet potato pie—that warm, spiced filling, the buttery crust, and the cozy nostalgia of a homemade treat. But let’s be real: making a full pie can be kind of a hassle. That’s where sweet potato pie bars come in. They’ve got all the goodness of the traditional pie, but in an easy-to-make, slice-and-serve form. No finicky pie crusts, no struggling to cut the perfect wedge—just grab a square and enjoy.
This article will walk you through everything you need to know about sweet potato pie bars: where they come from, how to make them, ingredient swaps, storage tips, and even FAQs. Whether you’re baking for Thanksgiving, a holiday gathering, or just a random Tuesday when you need a little comfort food, these bars will hit the spot.
The Origins and Evolution of Sweet Potato Pie Bars
A Southern Classic with a Twist
If you grew up in the South, sweet potato pie was probably a staple at your family gatherings. Unlike pumpkin pie—its more famous cousin—this dessert is all about that rich, naturally sweet flavor of sweet potatoes, with warm spices like cinnamon, nutmeg, and ginger bringing it all together.
But where did it all start? Well, sweet potatoes have been a part of Southern cuisine for centuries, especially in African American communities. Enslaved people in the U.S. South used sweet potatoes in place of African yams, creating the foundation for what would become sweet potato pie. Over time, it became a holiday essential, baked into golden crusts and passed down through generations.
Now, enter sweet potato pie bars. In today’s fast-paced world, we love recipes that are just as tasty but way easier to make and serve. Turning pie into bars means:
- Less fuss (no rolling out a crust, no worrying about it cracking)
- Better for serving crowds (you can cut them into small squares or big slabs)
- More versatility (you can tweak the crust, the filling, and the toppings however you like)
Why Bars? The Rise of Convenient Desserts
People love dessert bars because they’re portable, shareable, and honestly, just more fun. No forks needed—just grab and go! Plus, bars cool down faster than a whole pie, which means you can dig in sooner (because, let’s face it, waiting is the hardest part).
With sweet potato pie bars, you get that smooth, velvety filling with a buttery, crumbly crust in every bite. And if you like to experiment? Oh, you’re in for a treat—because there are so many ways to jazz them up! (But more on that later.)
Next up, let’s talk about what goes into making the best sweet potato pie bars—and trust me, ingredients matter!
Essential Ingredients for Sweet Potato Pie Bars
Alright, before we get baking, let’s talk ingredients. The secret to amazing sweet potato pie bars? Using quality ingredients and knowing which swaps work best.
Crust Options: The Base of It All
Every great dessert starts with a solid foundation. For sweet potato pie bars, that means a crust that holds up without overpowering the filling. Here are a few options:
- Graham Cracker Crust – Classic, slightly sweet, and easy to throw together.
- Biscoff Cookie Crust – Adds a spiced, caramel-like flavor that complements the sweet potatoes perfectly.
- Pecan Shortbread Crust – Buttery, nutty, and a little fancy. It takes things up a notch!
No matter which one you choose, a key step is pre-baking the crust for a few minutes before adding the filling. This prevents sogginess and keeps everything intact.
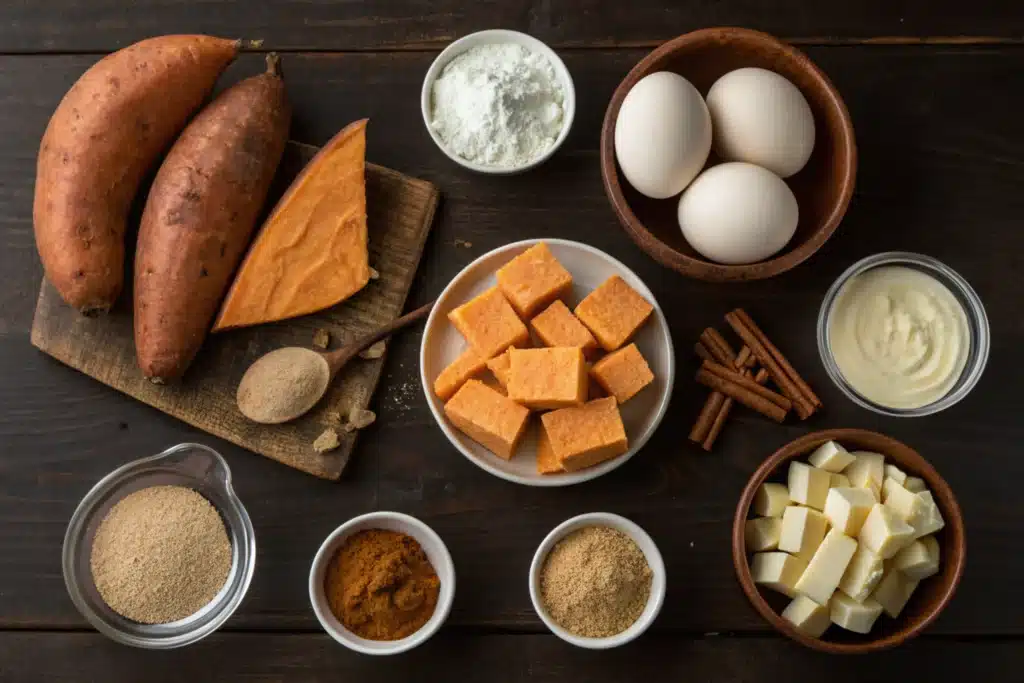
Sweet Potato Filling: The Star of the Show
You can’t have sweet potato pie bars without that rich, creamy filling. Here’s what you’ll need:
- Sweet Potatoes – Fresh is best! Roast them instead of boiling for a deeper flavor.
- Sweeteners – Brown sugar, maple syrup, or even coconut sugar work well.
- Spices – Cinnamon, nutmeg, ginger, and cloves for that warm, comforting taste.
- Eggs & Cream – These make the filling velvety and hold everything together. (For a vegan version, we’ll cover subs later!)
Toppings and Extras
Want to make these bars even better? Try:
- Toasted Marshmallows – A nod to sweet potato casserole.
- Streusel Crumble – Adds crunch and sweetness.
- Whipped Cream or Caramel Drizzle – Because why not?
Now that we’ve got our ingredients, let’s get to the fun part—baking!
Step-by-Step Guide to Making Sweet Potato Pie Bars
Time to get baking! Follow these steps, and you’ll have a batch of irresistible sweet potato pie bars before you know it.
Step 1: Preparing the Crust
- Crush the cookies or crackers – Use a food processor or a zip-top bag and a rolling pin.
- Mix with melted butter – The butter binds everything together.
- Press into a pan – Use the back of a spoon to create an even layer.
- Pre-bake at 350°F for 8-10 minutes – This step prevents sogginess later.
Let it cool while you move on to the filling.
Step 2: Making the Sweet Potato Filling
Roast the sweet potatoes – Bake them at 400°F until soft (about 45 minutes). Roasting enhances their natural sweetness and gives a deeper flavor.
Peel and mash – Once cool, remove the skins and mash the flesh until smooth. For an ultra-creamy texture, use a food processor or blender.
Mix in the spices, sugar, eggs, and cream – Combine everything in a large bowl, whisking until well blended. Make sure there are no lumps for a silky filling.
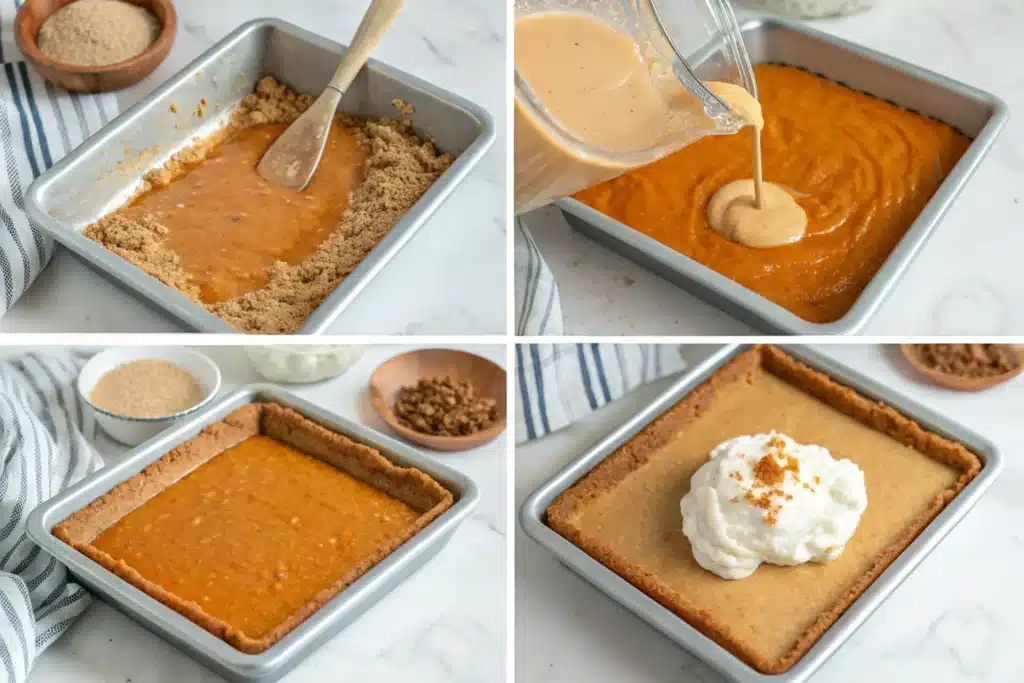
Step 3: Assembling and Baking
- Pour the filling over the pre-baked crust – Smooth it out with a spatula.
- Bake at 350°F for 35-40 minutes – The center should be set but still slightly jiggly.
- Let it cool completely – This is the hardest part, but trust me, it’s worth it!
Step 4: Adding Toppings (Optional but Highly Recommended!)
- For marshmallows – Add them in the last 5 minutes of baking and broil until golden brown.
- For streusel – Mix brown sugar, flour, butter, and chopped nuts, then sprinkle before baking.
- For caramel drizzle – Just heat up store-bought caramel or make your own!
Once cooled, cut into squares and serve. These bars are so good, you might want to make a double batch!
Next up, I’ll share my best tips to make sure your bars turn out perfect every single time. Stay tuned!
Tips and Tricks for Perfect Sweet Potato Pie Bars
Making sweet potato pie bars is pretty straightforward, but a few insider tips can take them from good to downright irresistible. Let’s dive into some handy tricks to ensure your bars are the talk of the town.
Selecting the Best Sweet Potatoes
- Varieties Matter: While any sweet potato can work, orange-fleshed varieties like Beauregard or Jewel are top picks. They’re naturally sweet and give that rich, classic flavor we all love.
- Freshness is Key: Choose sweet potatoes that are firm, smooth, and free from blemishes. Avoid any with soft spots or sprouts—they’re past their prime.
Achieving the Ideal Texture
- Roasting Over Boiling: Roasting sweet potatoes intensifies their natural sweetness and keeps them from getting waterlogged. Simply pierce them with a fork, pop them in the oven at 400°F for about 45-60 minutes until tender, then scoop out the goodness.
- Smooth Operator: For that silky filling, mash the roasted sweet potatoes thoroughly. A food processor or blender works wonders here, ensuring a lump-free mixture.
Preventing a Soggy Crust
- Pre-Bake the Crust: Before adding the filling, give your crust a quick bake—about 8-10 minutes at 350°F. This sets it up nicely and keeps it crisp.
- Cool It Down: Let the pre-baked crust cool slightly before pouring in the filling. This little pause helps maintain that delightful crunch.
Flavor Enhancements
- Citrus Zest: A touch of orange or lemon zest in the filling can brighten up the flavors, adding a subtle zing that complements the sweetness.
- Alternative Sweeteners: Experimenting with maple syrup or coconut sugar can introduce unique flavor notes. Just remember to adjust quantities, as some sweeteners are more potent than others.
By keeping these tips in mind, you’ll whip up sweet potato pie bars that are not only delicious but also have that perfect balance of texture and flavor. Happy baking!
Variations and Dietary Adaptations
One of the best things about sweet potato pie bars is their versatility. Whether you’re catering to dietary needs or just feeling adventurous, there are plenty of ways to tweak this classic treat. Let’s explore some delicious variations.
Gluten-Free Sweet Potato Pie Bars
- Almond Flour Crust: Swap out traditional flour for almond flour. It offers a nutty flavor and tender texture. Mix it with melted coconut oil and a touch of sweetener, press into your pan, and pre-bake as usual. Flora and Vino
- Oat and Nut Base: Combine gluten-free oats with pecans and a flax egg to create a sturdy, flavorful crust. This combo adds a delightful chewiness and crunch. From My Bowl
Vegan Adaptations
- Egg Replacements: Use a flaxseed meal mixture (1 tablespoon flaxseed meal + 2.5 tablespoons water = 1 egg) to bind the filling without eggs.
- Dairy-Free Creaminess: Full-fat coconut milk is a fantastic substitute for dairy cream, providing richness without the lactose.
- Natural Sweeteners: Opt for maple syrup or agave nectar to sweeten the filling naturally and keep it vegan-friendly.
Flavor Variations
- Chocolate Lovers: Incorporate cocoa powder into the filling or sprinkle chocolate chips over the crust before adding the filling. The marriage of chocolate and sweet potato is unexpectedly delightful.
- Nutty Additions: Fold in chopped pecans or walnuts into the filling for added texture and a rich, earthy flavor.
- Spice It Up: Beyond the usual cinnamon and nutmeg, try adding cardamom or a hint of cayenne pepper for a spicy kick that contrasts beautifully with the sweetness.
Alternative Crust Ideas
- Ginger Snap Crust: Crushed ginger snap cookies mixed with melted butter create a spicy-sweet base that pairs wonderfully with the sweet potato filling.
- Oatmeal Crust: A blend of rolled oats, brown sugar, and butter (or coconut oil) offers a chewy, hearty crust option.
By experimenting with these variations, you can tailor sweet potato pie bars to fit different tastes and dietary requirements, ensuring everyone gets to enjoy this scrumptious dessert.
Serving Suggestions and Storage Tips

So, you’ve baked a batch of sweet potato pie bars—now what? Let’s talk about the best ways to serve, store, and even reheat them to keep them tasting fresh and delicious.
Presentation Ideas
First impressions matter! Even the most rustic desserts can look extra fancy with the right finishing touches.
- Cutting Clean Squares – Let the bars cool completely before slicing. A sharp knife (wiped clean between cuts) helps create neat, bakery-style squares.
- Garnishing for Extra Flair – A light dusting of powdered sugar, a drizzle of caramel sauce, or even a dollop of whipped cream can take these bars to the next level.
- Pairing with Other Desserts – These bars go great alongside a scoop of vanilla ice cream or a warm cup of cinnamon-spiced coffee.
Storage and Shelf Life
Want to save some for later? Here’s how to keep them fresh:
- Refrigeration – Store leftover bars in an airtight container in the fridge for up to 5 days.
- Freezing for Longer Storage – Wrap each bar individually in plastic wrap and freeze for up to 3 months. When ready to eat, let them thaw in the fridge overnight.
Reheating Tips
- Microwave – Quick and easy! Pop a bar in for 10-15 seconds to warm it up.
- Oven Method – For that freshly baked feel, reheat in a 300°F oven for about 5 minutes.
Now that we’ve got storage covered, let’s dive into some common sweet potato pie bar questions!
Frequently Asked Questions
Baking comes with its fair share of questions, and sweet potato pie bars are no exception. Here are answers to some of the most common ones.
Can I use canned sweet potatoes instead of fresh?
Yes, but fresh is better! Canned sweet potatoes can be a time-saver, but they’re often packed in syrup, making them extra sweet. If using canned, rinse and drain them well before mashing. Freshly roasted sweet potatoes will always give a deeper, richer flavor.
How do I prevent the crust from becoming soggy?
Nobody wants a mushy crust! A few tricks help:
- Pre-bake the crust before adding the filling.
- Let the crust cool slightly before pouring in the filling.
- Don’t overdo the moisture—too much liquid in the filling can seep into the crust.
What toppings pair well with sweet potato pie bars?
There are so many tasty options! Some favorites include:
- Toasted marshmallows (for that classic holiday feel)
- Crumbled pecans or walnuts (for a bit of crunch)
- Whipped cream or Greek yogurt (for a creamy contrast)
- Caramel drizzle or maple syrup (for an extra indulgent touch)
With these tips and tricks, you’re all set to make the best sweet potato pie bars. Ready to get baking? Let’s do this! 🎉
Conclusion
And there you have it—sweet potato pie bars that are easy, delicious, and perfect for any occasion! Whether you’re baking for a holiday feast, a cozy fall treat, or just craving something sweet, these bars deliver all the flavors of classic sweet potato pie in a simple, grab-and-go format.
With a buttery crust, a creamy, spiced filling, and endless topping options, you can customize them to suit your taste. Plus, they store well, making them a great make-ahead dessert.
So, why not skip the hassle of pie crust and whip up a batch of these instead? Trust me, once you try them, you’ll find yourself making them again and again. Happy baking, and don’t forget to share these bars with someone who loves sweet potato pie as much as you do!
Print
Sweet Potato Pie Bars: A Delectable Twist on a Classic Dessert
- Total Time: 55 minutes
- Yield: 12 bars 1x
Description
Skip the hassle of pie crust and enjoy all the cozy flavors of sweet potato pie in easy-to-make bars! With a buttery crust, smooth spiced filling, and optional toppings like marshmallows or streusel, these bars are perfect for Thanksgiving, holiday gatherings, or everyday indulgence. Slice and serve—no forks required!
Ingredients
For the Crust:
- 1 ½ cups graham cracker crumbs (or Biscoff cookie crumbs)
- ¼ cup granulated sugar
- ½ cup unsalted butter, melted
(Alternative: Use a pecan shortbread crust for a nutty twist!)
For the Sweet Potato Filling:
- 2 cups mashed sweet potatoes (roasted for best flavor)
- ½ cup brown sugar
- 2 large eggs
- ¾ cup heavy cream (or coconut milk for dairy-free)
- 1 teaspoon vanilla extract
- 1 teaspoon cinnamon
- ½ teaspoon nutmeg
- ¼ teaspoon ground ginger
- ¼ teaspoon salt
Optional Toppings:
- Toasted marshmallows – Classic and fun!
- Pecan streusel – Adds a crunchy, sweet contrast.
- Caramel drizzle – For an indulgent touch.
- Whipped cream – Light and fluffy topping.
Instructions
Step 1: Prepare the Crust
- Preheat your oven to 350°F (175°C).
- In a bowl, mix graham cracker crumbs, sugar, and melted butter until combined.
- Press the mixture into a 9×9-inch baking pan lined with parchment paper.
- Bake for 8-10 minutes, then let it cool slightly.
Step 2: Make the Sweet Potato Filling
- In a large bowl, whisk together mashed sweet potatoes, brown sugar, eggs, heavy cream, vanilla, and spices until smooth. (For extra creamy texture, blend in a food processor!)
- Pour the filling over the pre-baked crust and spread evenly.
Step 3: Bake the Bars
- Bake for 35-40 minutes, or until the center is set but slightly jiggly.
- Let cool completely before slicing—this helps the bars firm up.
Step 4: Add Toppings (Optional, but Highly Recommended!)
- If using marshmallows, add them in the last 5 minutes and broil until golden brown.
- For streusel, mix ⅓ cup flour, ⅓ cup brown sugar, 3 tablespoons butter, and ½ cup chopped pecans, then sprinkle on top before baking.
- Once cooled, drizzle with caramel sauce or serve with whipped cream.
Notes
Additional Notes & Variations:
- Gluten-Free Version: Use a gluten-free graham cracker crust or swap with almond flour and coconut oil.
- Vegan Option: Replace eggs with flax eggs (1 tbsp flaxseed + 2.5 tbsp water per egg) and use coconut milk instead of heavy cream.
- Nut-Free Alternative: Skip pecans and use a Biscoff cookie crust for a nut-free version.
- Extra Spice: Add 1/4 teaspoon cardamom for a warm, unique twist!
Serving Suggestions:
✔ 🍨 With Vanilla Ice Cream – For a hot-and-cold contrast.
✔ 🍯 With Maple Syrup or Honey Drizzle – Adds natural sweetness.
✔ ☕ With a Cup of Spiced Coffee or Chai Tea – Perfect pairing for fall flavors!
Storage & Meal Prep Tips:
- Refrigeration: Store bars in an airtight container for up to 5 days.
- Freezing: Wrap each bar individually in plastic wrap and freeze for up to 3 months.
- Reheating: Warm in the microwave (15 sec) or oven at 300°F for 5 minutes.
(They taste just as good cold, straight from the fridge!)
- Prep Time: 15 minutes
- Cook Time: 40 minutes
- Cuisine: Southern, American
Nutrition
- Calories: ~250 kcal
- Sugar: ~18g
- Fat: ~12g
- Carbohydrates: ~32g
- Fiber: ~2g
- Protein: ~4g